

Are you looking for a way to funnel users to your newest content, latest product, or new project? Do you need simple but adaptive landing page to drive web traffic from your presence on social media sites like TikTok, Instagram, LinkedIn, or Facebook? Don't want to deal with the hassle of updating your links on each social media page every time you have a new resource to share or campaign to promote? Having a single, one-stop web page where visitors can land to find everything they may need know about you can be handy to use across social media websites.
Businesses, influencers, entrepreneurs, activists, hobbyists and other individuals may use a service like Linktree or Beacons where they can dump a list of links onto one page and then just share their Linktree or Beacons profile. Even though there's a free tier for each of these services, you will need to subscribe to one of their paid tiers to have additional features such as more robust customization, additional pages, or access to in-depth analytics on how your links are performing and where your visitors are going.
If you already pay for hosting of your own website - like I do through Squarespace - why pay more money for something when you can quickly set up through the WYSIWYG editor for no additional monthly fee? By the end of this article, you'll have an adaptive web page with the same functionality of a Linktree page that will not only come in at no additional cost, but you'll also have access to all the analytics for the traffic you drive as well!
Follow the steps below to build your own Linktree clone. Please note: I am using Squarespace 7.0 or higher with the Bedford family of templates for these steps.
Making the Page
1) Log in to your Squarespace dashboard and click the "Pages" section.

We’ll only be working in the Pages section.
2) On the left side, scroll down to the "Not Linked" section and click the plus sign to add a new unlinked web page
3) Under the Layout section, click "About" and then select the "Vertical" option. This will start out with a simple centered layout that gives an image block, a text block, social media block, and some spacers for visual placement. You can start with just a blank template page and build you own if you wish, but I found that using the Vertical About layout template was quickest for me to get a Linktree clone up and running.
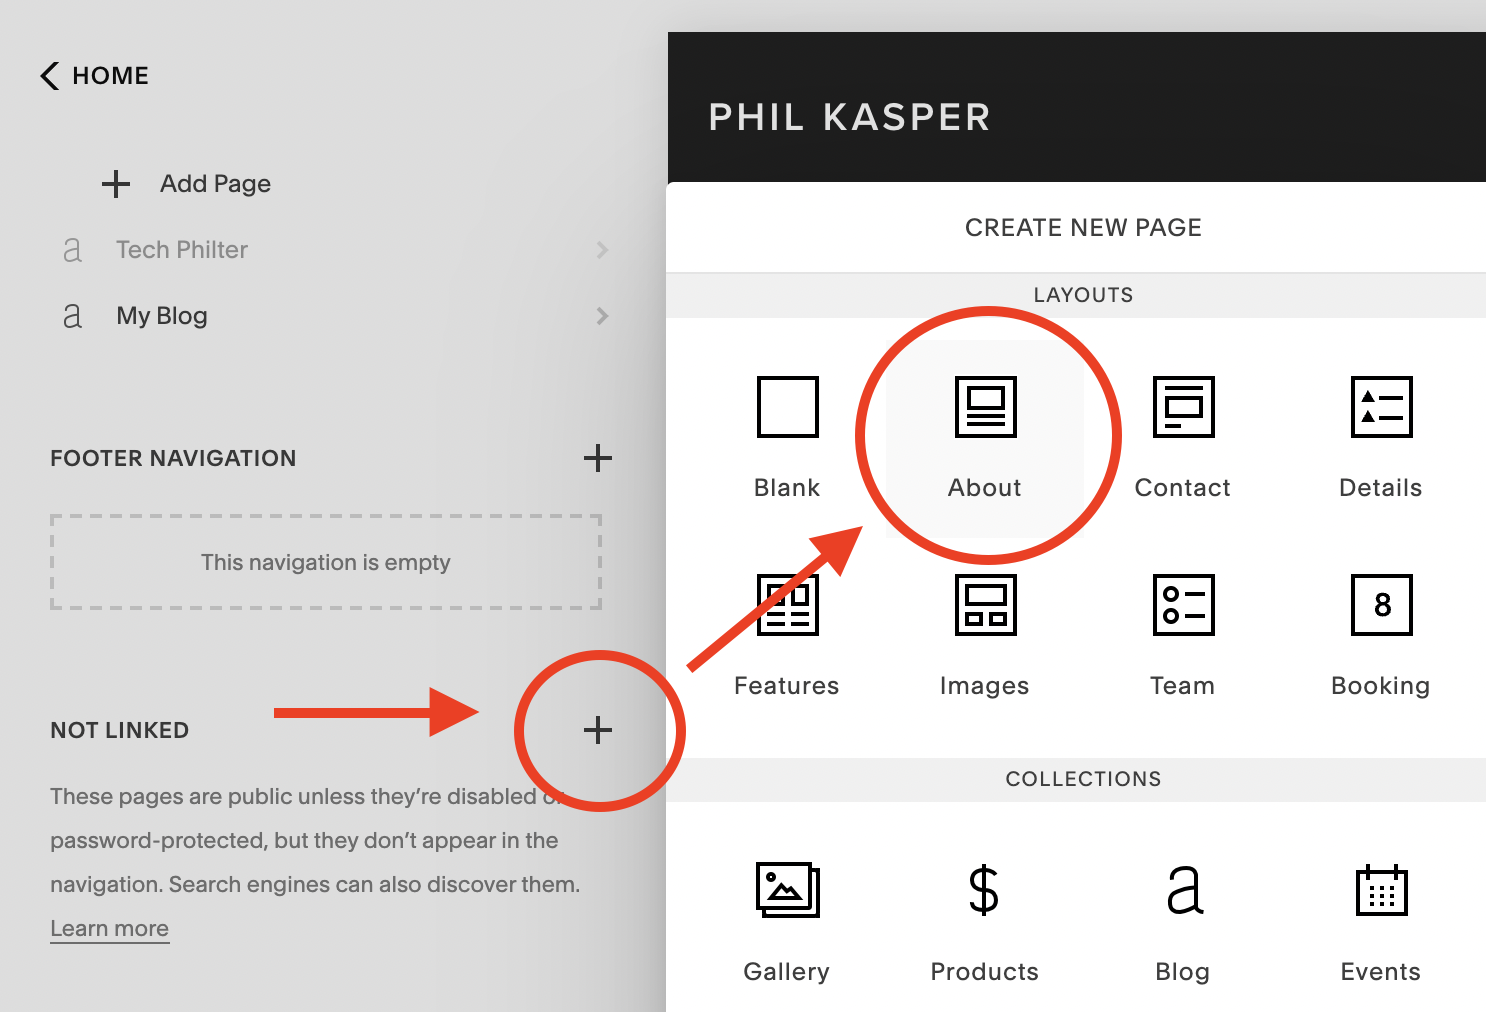
Click the plus sign “+” then the “About” layout option for quick setup.

Choose the “Vertical” option - it will show up best for mobile users after setup.
4) Name the new page on the left side panel to something unique/descriptive so you'll know what the page is for (I used "philslinks" for this example).

Give your new page a name.
5) Hover you mouse over the page on the left side and click the settings cog. On the Page Settings screen that pops up, give your new webpage a short, memorable but unique URL slug or just leave it as the default of whatever you named your page in Step 4. Click "Close" for the Page Settings menu

We’ll need to adjust a setting for the page.

Change the URL slug if you wish and click “Close”
6) Now's the time to build out your web page! Hover your mouse over the right pane and click the "Edit" button to enter into the Page Editor.

Click “Edit” to get started building your own Linktree
7) Here you can start customizing your page to your liking. I have the basic areas outlined in the template below. I recommend leaving the default spacers and uploading a custom image (your profile picture, your business logo, etc.) for the Image Block.
Layout described in Step 7.
8) After uploading your custom image, I suggest going into the settings for the Image Block and turning off the caption in the Content tab and changing the shape from Original to Shape (default is a circle) in the Design tab. You can also play around with animations if you wish in the Design tab as well, but leaving everything else as the default is fine.


9) Scrolling down you will see a default text block sandwiched between two Spacer Blocks centered on the page. I suggest deleting these, moving the Social Media block to be just below your custom image, and adding a Text Block and however many Button Blocks you wish to use for links.

Delete these three blocks: the top Spacer Block, the Text Block, and the bottom Spacer Block.

Move the Social Block to be below your Image Block, add a Text Block and Button Blocks
10) The buttons can be edited to display custom text and a custom link that, when clicked, will take the visitor to the specified URL.

Customize your Button Blocks
11) When done editing your buttons and getting your website the way you want, click "Save" to exit out the Page Editor and you're done!
That’s it!
Great job! You've just set up your own personal Linktree. All that's needed to do now is copy your new page's URL and paste it into your social media profiles. Whenever you want to add a new link in the future, you will only need to add a new button in the Page Editor from the Squarespace dashboard on a computer or through the Squarespace app of your iOS or Android device.
There's much more you can do to customize your page to make it look flashier, but that involves advanced topics like modifying the CSS of your website among other things that are beyond the scope of this tutorial. That I'll leave as an exercise for the reader. For now, farewell and happy linking!
